需求
1. 首先需要有可開機的DOS系統磁碟機,透過USB隨身碟替代
2. 更新BIOS程式:afudos.exe
3. 新版本的BIOS:例如20080101.ROM
步驟
1. 開機按F2,選擇適當的槽開機進入DOS模式
2. 輸入以下指令
afudos /i檔名.附檔名
例如:afudos i20080101.ROM /pbnc
注意:請勿在更新 BIOS 過程關閉或重新啟動系統!此舉將會導致系統毀損!就是最好插電才執行的意思
ref: http://support.asus.com.tw/technicaldocuments/technicaldocuments_content.aspx?no=193&SLanguage=zh-tw
2008年9月21日 星期日
進階主機控制器介面 ( Advanced Host Controller Interface(AHCI) )
1. 簡介AHCI:
1.1.中文:
「進階主機控制器介面 (AHCI)」是一種介面規格,可讓儲存裝置的驅動程式啟用進階的序列 ATA 功能,例如原生指令佇列( Native Command Queuing(NCQ) )及熱插拔(hot-plugging)。
1.2. 英文:
The Advanced Host Controller Interface (AHCI) is a hardware mechanism that allows software to communicate with Serial ATA (SATA) devices (such as host bus adapters) that are designed to offer features not offered by Parallel ATA (PATA) controllers, such as hot-plugging and native command queuing. The specification details a system memory structure for computer hardware vendors in order to transfer data between system memory and the device. As of June 2008, the current version of the specification is v1.3.
2. 何謂熱插拔?
熱插拔是進階主機控制器介面 (AHCI) 與 IntelR 組合儲存技術支援的功能。 熱插拔功能可以在系統執行的同時,進行裝置的移除及插入。
3. 何謂原生指令佇列?
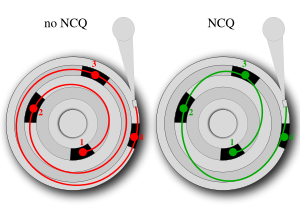
原生指令佇列 (NCQ) 是進階主機控制器介面 (AHCI) 的一種功能,為一硬碟讀取加速技術。透過硬碟韌體、硬碟控制器以及作業系統三者的互相配合,可以讓 ATA 磁碟機一次接受多個指令並動態重新排列指令,以達到最高的效率。 NCQ 若搭配支援 NCQ 的硬碟機共同使用,可以提高隨機工作負載的儲存效能,約略可以提高硬碟效能約30%。
3.1. NCQ原理
一般硬碟使用的硬碟格式通常為Windows 98核心所使用的FAT32系列,或是Windows NT所使用的NTFS,此種硬碟格式在存放資料時,時常會出現散亂的情況,導致一個檔案分散成許多區段於磁盤上面,時間長久之後,由於檔案散亂的程度日趨嚴重,便會導致硬碟讀取效能逐漸下降。一旦發生這樣的問題,解決方案便是使用硬碟重組軟體重組硬碟,將散亂的檔案重新排列為連續的區塊。有鑑於此,NCQ原本的概念其實是應用在伺服器中的SCSI介面上,不過NCQ可以說是專門提供給SATA介面使用。傳統的硬碟讀取方式,會從檔案的開頭依序讀取到結尾;換句話說,如果檔案的開頭在磁盤最外圈,而結尾在磁盤的最內圈時,機械臂便會先移動到最外圈,再移至最內圈讀取,若檔案散亂的程度愈嚴重,則機械臂需要移動的距離就越長。而啟用NCQ技術的硬碟,在讀取檔案時,會依照檔案在硬碟上的分佈,將存取的順序作最有效率的排序,以減少機械臂移動的距離,進而達到省時以及延長硬碟壽命的效果。
如圖
3.2. NCQ優勢
於 SATA II NCQ 協定中,新增3個功能,分別是:
3.2.1. Race-free status return mechanism:
硬碟在完成任一指令後,可以無須再進行Handshake即可繼續另一個指令,以便讓多個指令快速接序或同時執行。
3.2.2. Interrupt aggregation:
硬碟由於以NCQ模式執行多個指令,所以原本每一個指令完成後必須中斷(interrupt) 以便讓系統接續處理的模式,轉成可以在多個指令完成後再一次提出(interrupt) ,故介面控制器(host controller) 對於多個指令只須處理一次中斷即可。
3.2.3. First party DMA(FPDMA):
當硬碟完成資料讀取後,無須靠 host controller 的DMA動作取得特定記憶體位置,而是由硬碟本身建立 DMA setup FIS (Frame Information Block)直接對 host controller 送出記憶體存取通知,如此無須驅動程式的運作,可以有效提升存取效率。
ref:
http://en.wikipedia.org/wiki/Advanced_Host_Controller_Interface
http://www.intel.com/technology/serialata/ahci.htm
http://www.intel.com/support/tw/chipsets/imst/sb/CS-012305.htm
http://www.intel.com/support/tw/chipsets/imst/sb/CS-012308.htm
http://www.intel.com/support/tw/chipsets/imst/sb/CS-012304.htm
1.1.中文:
「進階主機控制器介面 (AHCI)」是一種介面規格,可讓儲存裝置的驅動程式啟用進階的序列 ATA 功能,例如原生指令佇列( Native Command Queuing(NCQ) )及熱插拔(hot-plugging)。
1.2. 英文:
The Advanced Host Controller Interface (AHCI) is a hardware mechanism that allows software to communicate with Serial ATA (SATA) devices (such as host bus adapters) that are designed to offer features not offered by Parallel ATA (PATA) controllers, such as hot-plugging and native command queuing. The specification details a system memory structure for computer hardware vendors in order to transfer data between system memory and the device. As of June 2008, the current version of the specification is v1.3.
2. 何謂熱插拔?
熱插拔是進階主機控制器介面 (AHCI) 與 IntelR 組合儲存技術支援的功能。 熱插拔功能可以在系統執行的同時,進行裝置的移除及插入。
3. 何謂原生指令佇列?
原生指令佇列 (NCQ) 是進階主機控制器介面 (AHCI) 的一種功能,為一硬碟讀取加速技術。透過硬碟韌體、硬碟控制器以及作業系統三者的互相配合,可以讓 ATA 磁碟機一次接受多個指令並動態重新排列指令,以達到最高的效率。 NCQ 若搭配支援 NCQ 的硬碟機共同使用,可以提高隨機工作負載的儲存效能,約略可以提高硬碟效能約30%。
3.1. NCQ原理
一般硬碟使用的硬碟格式通常為Windows 98核心所使用的FAT32系列,或是Windows NT所使用的NTFS,此種硬碟格式在存放資料時,時常會出現散亂的情況,導致一個檔案分散成許多區段於磁盤上面,時間長久之後,由於檔案散亂的程度日趨嚴重,便會導致硬碟讀取效能逐漸下降。一旦發生這樣的問題,解決方案便是使用硬碟重組軟體重組硬碟,將散亂的檔案重新排列為連續的區塊。有鑑於此,NCQ原本的概念其實是應用在伺服器中的SCSI介面上,不過NCQ可以說是專門提供給SATA介面使用。傳統的硬碟讀取方式,會從檔案的開頭依序讀取到結尾;換句話說,如果檔案的開頭在磁盤最外圈,而結尾在磁盤的最內圈時,機械臂便會先移動到最外圈,再移至最內圈讀取,若檔案散亂的程度愈嚴重,則機械臂需要移動的距離就越長。而啟用NCQ技術的硬碟,在讀取檔案時,會依照檔案在硬碟上的分佈,將存取的順序作最有效率的排序,以減少機械臂移動的距離,進而達到省時以及延長硬碟壽命的效果。
如圖

3.2. NCQ優勢
於 SATA II NCQ 協定中,新增3個功能,分別是:
3.2.1. Race-free status return mechanism:
硬碟在完成任一指令後,可以無須再進行Handshake即可繼續另一個指令,以便讓多個指令快速接序或同時執行。
3.2.2. Interrupt aggregation:
硬碟由於以NCQ模式執行多個指令,所以原本每一個指令完成後必須中斷(interrupt) 以便讓系統接續處理的模式,轉成可以在多個指令完成後再一次提出(interrupt) ,故介面控制器(host controller) 對於多個指令只須處理一次中斷即可。
3.2.3. First party DMA(FPDMA):
當硬碟完成資料讀取後,無須靠 host controller 的DMA動作取得特定記憶體位置,而是由硬碟本身建立 DMA setup FIS (Frame Information Block)直接對 host controller 送出記憶體存取通知,如此無須驅動程式的運作,可以有效提升存取效率。
ref:
http://en.wikipedia.org/wiki/Advanced_Host_Controller_Interface
http://www.intel.com/technology/serialata/ahci.htm
http://www.intel.com/support/tw/chipsets/imst/sb/CS-012305.htm
http://www.intel.com/support/tw/chipsets/imst/sb/CS-012308.htm
http://www.intel.com/support/tw/chipsets/imst/sb/CS-012304.htm
改變Eee PC的快速鍵
因為Eee PC是採用icewm來當作window manager,所以修改的地方是在這個檔案
/etc/X11/icewm/keys
由於我較常用的功能只有這幾個,所以暫時追加這幾個而已,事實上有很多快捷鍵都是不能用的,因為在Eee PC中並沒有安裝這些程式
key "Alt+Ctrl+t" sudo x-terminal-emulator
key "Alt+Ctrl+i" sudo firefox
key "Alt+Ctrl+f" sudo XandrosFileManager --title Payton --maximized
key "Alt+Ctrl+g" sudo gedit
key "Alt+Ctrl+h" sudo halt
更改完成後,利用一個隱藏的快速鍵『Ctrl + Alt + Backspace』來快速重新啟動icewm,以便讓所有的快速鍵生效
同時Alt + F10也是另一個我常用的快速鍵,此鍵可以將視窗放到最大
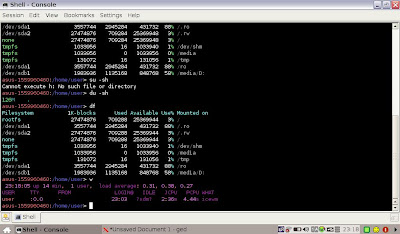
為Linux的shell穿上衣服
If we have a colorful linux, the symbol behind the instructions will be clear.
Color Wrapper(CW) will help us.
1. Install Color Wrapper
Download cw from http://sourceforge.net/projects/cwrapper/
2. Unzip and install it
tar -jxvf cw-1.0.15.tar.bz2
cd cw-1.0.15
./configure
make install
3. Set environment
* For bash: place 'export PATH="/usr/local/lib/cw:$PATH"' at the end of ~/.bash_profile(or /etc/profile globally)
* For tcsh: place 'setenv PATH "/usr/local/lib/cw:$PATH"' at the end of ~/.login(or /etc/csh.login globally)
4. Done
try df and w

Hack simpleui.rc in Eee PC
這幾天遇到一些bug,一直在想要找出某一個按鍵對應到哪一支程式,此時常需要用很暴力的方法,就是
1. 按Ctrl + Alt + Del觀察那個是打開的程式
2. 在shell上打top,拖拉視窗,觀察那個是打開的程式
但是這樣對整個系統的瞭解太弱了,所以我做了下面的步驟,來破解一下Eee PC的simpleui.rc
# 1. We open /opt/xandros/share/AsusLauncher/simpleui.rc
# 2. This is head of simple ui
# 3. Define the background of simple ui
# 4. This is top tabs, we called simplecat (It may be abbreviated from "Simple categories")
# It also define a lot of languages
Internet
Internet
...
# 5. Folder definition. Ex. Science folder in Learn category
Science
Ciências
...
# 6. This is the mapping between applications and icons. (parcel stand for ??)
# This icon is in the Internet/WebMail and execute /opt/xandros/bin/p701-gmail.sh
Gmail
Gmail
...
# 7. This is messenger, but what is pidgin.desktop?
Messenger
Mensageiro Instantâneo
...
# 8. We found the shortcut place by tracing many shortcut tags
# Here store lot of shortcuts
/usr/share/applications/
# 9. pidgin.desktop has detail application information. When we execute pidgin, it will launch application "pidgin" directly.
# cat /usr/share/applications/pidgin.desktop
[Desktop Entry]
Encoding=UTF-8
Name=Pidgin Instant Messenger
GenericName=Instant Messenger
Comment=Send instant messages over multiple protocols
Comment[af]=Stuur kitsboodskappe oor veelvoudige protokolle
...
Comment[zh_TW]=透過多種通訊協定發送即時訊息
Exec=pidgin
Icon=pidgin
StartupNotify=true
Terminal=false
Type=Application
Categories=Network;InstantMessaging;
# 10. This is different from others? We can't find this shortcut?
Documents
Documentos
...
# 11. We found the secrets in simpleui.rc, There are many same "documents_hi.png" in it.
# That also means the old shortcut still in here, but only correct one will be executed.
asus-1559960460:/opt/xandros/share/AsusLauncher> grep 'documents_hi' ./simpleui.rc
777:
1366:
3453:
3832:
4003:
# 12. Let's hack simpleui.rc
# First of all, we write a hello world in /root
asus-1559960460:/root> cat ./hello.sh
#!/bin/sh
echo "Hello World!!"
asus-1559960460:/root>
# 13. We add the following code in /opt/xandros/share/AsusLauncher/simpleui.rc
# It will create a top tab, a folder, and a button
Hack Me
Hack Me Folder
Hello
# 14. Restart AsusLauncher, but nothing happened!! What's wrong!!
>ps aux | grep Asus
104:root 10165 28.0 0.7 26156 15424 pts/2 S 17:30 0:01 /opt/xandros/bin/AsusLauncher
110:root 10230 0.0 0.0 2852 712 pts/2 S+ 17:30 0:00 grep --color -n Asus
> kill 10165
> /opt/xandros/bin/AsusLauncher &
# 15. Find where is simpleui.rc in AsusLauncher by "strings"
# Ok, we find the clue in /var/lib/Asuslauncher/simpleui.rc
asus-1559960460:/opt/xandros/bin> strings AsusLauncher | grep simple
947:%1/simpleui.rc
961:simplecat
980:/var/lib/AsusLauncher/simpleui.rc
981:Failed to load customized simpleui.rc.
982:Failed to open customized simpleui.rc.
983:Failed to load system simpleui.rc.
984:Failed to open system simpleui.rc.
# 16. Remodified /var/lib/Asuslauncher/simpleui.rc again
# OK, succeess!
As figure

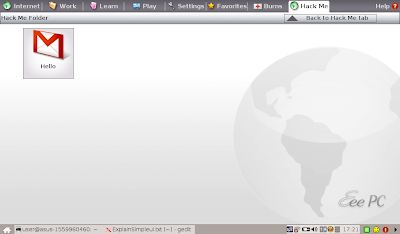
Notations:
1. The all desktop figures are in /opt/xandros/share/AsusLauncher/
2. But the real simpleui.rc is in /var/lib/Asuslauncher/simpleui.rc
1. 按Ctrl + Alt + Del觀察那個是打開的程式
2. 在shell上打top,拖拉視窗,觀察那個是打開的程式
但是這樣對整個系統的瞭解太弱了,所以我做了下面的步驟,來破解一下Eee PC的simpleui.rc
# 1. We open /opt/xandros/share/AsusLauncher/simpleui.rc
# 2. This is head of simple ui
# 3. Define the background of simple ui
# 4. This is top tabs, we called simplecat (It may be abbreviated from "Simple categories")
# It also define a lot of languages
...
# 5. Folder definition. Ex. Science folder in Learn category
...
# 6. This is the mapping between applications and icons. (parcel stand for ??)
# This icon is in the Internet/WebMail and execute /opt/xandros/bin/p701-gmail.sh
...
# 7. This is messenger, but what is pidgin.desktop?
...
# 8. We found the shortcut place by tracing many shortcut tags
# Here store lot of shortcuts
/usr/share/applications/
# 9. pidgin.desktop has detail application information. When we execute pidgin, it will launch application "pidgin" directly.
# cat /usr/share/applications/pidgin.desktop
[Desktop Entry]
Encoding=UTF-8
Name=Pidgin Instant Messenger
GenericName=Instant Messenger
Comment=Send instant messages over multiple protocols
Comment[af]=Stuur kitsboodskappe oor veelvoudige protokolle
...
Comment[zh_TW]=透過多種通訊協定發送即時訊息
Exec=pidgin
Icon=pidgin
StartupNotify=true
Terminal=false
Type=Application
Categories=Network;InstantMessaging;
# 10. This is different from others? We can't find this shortcut?
...
# 11. We found the secrets in simpleui.rc, There are many same "documents_hi.png" in it.
# That also means the old shortcut still in here, but only correct one will be executed.
asus-1559960460:/opt/xandros/share/AsusLauncher> grep 'documents_hi' ./simpleui.rc
777:
1366:
3453:
3832:
4003:
# 12. Let's hack simpleui.rc
# First of all, we write a hello world in /root
asus-1559960460:/root> cat ./hello.sh
#!/bin/sh
echo "Hello World!!"
asus-1559960460:/root>
# 13. We add the following code in /opt/xandros/share/AsusLauncher/simpleui.rc
# It will create a top tab, a folder, and a button
# 14. Restart AsusLauncher, but nothing happened!! What's wrong!!
>ps aux | grep Asus
104:root 10165 28.0 0.7 26156 15424 pts/2 S 17:30 0:01 /opt/xandros/bin/AsusLauncher
110:root 10230 0.0 0.0 2852 712 pts/2 S+ 17:30 0:00 grep --color -n Asus
> kill 10165
> /opt/xandros/bin/AsusLauncher &
# 15. Find where is simpleui.rc in AsusLauncher by "strings"
# Ok, we find the clue in /var/lib/Asuslauncher/simpleui.rc
asus-1559960460:/opt/xandros/bin> strings AsusLauncher | grep simple
947:%1/simpleui.rc
961:simplecat
980:/var/lib/AsusLauncher/simpleui.rc
981:Failed to load customized simpleui.rc.
982:Failed to open customized simpleui.rc.
983:Failed to load system simpleui.rc.
984:Failed to open system simpleui.rc.
# 16. Remodified /var/lib/Asuslauncher/simpleui.rc again
# OK, succeess!
As figure


1. The all desktop figures are in /opt/xandros/share/AsusLauncher/
2. But the real simpleui.rc is in /var/lib/Asuslauncher/simpleui.rc
2008年9月17日 星期三
更換Eee PC 的kernel
先在Eee PC中將kernel編好後,同『Eee PC 進不了X window!!』步驟,進入shell,執行下列步驟:
# mount sda2 and copy new System.map, bzImage, and modules into /boot
mkdir /mnt/sda2
mount /dev/sda2 /mnt/sda2
cp /mnt/sda2/usr/src/linux-source-2.6.26.1-eeepc/System.map /boot/System.map-2.6.26.1-eeepc
cp /mnt/sda2/usr/src/linux-source-2.6.26.1-eeepc/arch/i386/boot/bzImage /boot/vmlinuz-2.6.26.1-eeepc
mkdir /lib/modules/2.6.26.1-eeepc
cp -a /mnt/sda2/lib/modules/2.6.26.1-eeepc/ /lib/modules/2.6.26.1-eeepc/
再來修改/boot/grub/menu.list,其中/boot/initramfs-eeepc.img不用更動,其餘的就照一般改變kernel版本的方式來進行即可
Eee PC 進不了X window!!
利用init=/bin/bash,在Eee PC上做系統的增錯與更換kernel,
這幾天改寫了一支小程式,來做iso image,但是做完的iso image偶而會無法登入,原因應該是是第一次登入的語言設定沒有做好,所以重灌後看到的畫面是,登入然後就登出了,完全沒有看到第一次登入的設定選項,因此需要透過一點小技巧來察看xorg的問題
由於Eee PC採用aufs,所以會有兩個/boot,一個在/dev/sda1,一個在/dev/sda2,開機後的是/dev/sda2的,開機前的是/dev/sda1,所以需要透過下列步驟,來看xorg的debug
Restart NB, and enter grub menu to modify boot sequence
When system restart, press "F9"
Select "Normal Boot", and then press "e"
Press "d" to delete "initrd /boot/initramfs-eeepc.img"
Press "e" to modify “kernel /boot/vmlinuz-2.6.21.4-eeepc quiet rw vga=785 irqpoll i8042.noloop=1 root=/dev/sda1 XANDROSSCAN=y" to "kernel /boot/vmlinuz-2.6.21.4-eeepc quiet rw vga=785 root=/dev/sda1 init=/bin/bash"
Press “Enter” to leave.
Select “kernel /boot/vmlinuz-2.6.21.4-eeepc quiet rw vga=785 root=/dev/sda1 init=/bin/bash”,and Press “b” to boot
進shell後
> mount /dev/sda2 /mnt
> cat /mnt/var/log/Xorg.0.log
就可以看到錯誤訊息了
2008年9月16日 星期二
閱讀使人見識廣泛,討論使人反應靈敏,寫作使人思考精確
由於現在我們公司的Eee PC是一個很新的產品,因此有很多東西還沒有做得很好,例如我目前了解到的是遇到問題的解決方式,不同model間遇到的問題,可能都很相似,或現在遇到的問題其實不久前也有同事曾經遇到過並且解決過的。如果能夠妥善的分享知識,那便能夠踩著巨人的肩膀一起往上爬,使得所有的人都能夠互相踩著肩膀往上。
尤其是在系統廠,很容易遇到太多的問題,常會有軟硬體整合以及版本間整合的問題,誰能垂直水平整合的比較快,就有能力做出更多更好的東西。如何能夠快速的做垂直跟水平的整合,經驗傳承是其中一個非常重要的課題,其二,是加快流程的課題。對於經驗傳承課題而言,培養這種能力至關重要,但也相當難培養,目前仍以以戰養戰,與人共同分享經驗,來加快產品的導入與開發。 至於加快流程課題,小弟曾經有幸能夠參與google與聯發科的相關座談會,身為企業的龍頭,在公司內部不斷的在尋找一種方法:讓事情做得更好的方法。這並不是公司說法,而是內部員工很多都是這種心態,每個人都在尋求新的突破、新的做事方式,因此也造就了難以撼動的根基。當然課題很多,目前就先以我身邊相關的來分享而已。
現在有很多的開放軟體的社群或是很多人的部落格也都有在分享經驗,而在現在網路的世界中,『資料是無限的』甚至『資料是氾濫的』已經是一種現象了,所以我覺得能夠keep the knowledge in mind for long time, 以及organization information的能力變成為最主要的關鍵,目前我覺得將學習到的經驗做reorganization的動作,並分享在部落格中,將同時有助於這兩個關鍵能力。另一方面,施比受更有福,當我在重新作經驗分享的時候,我覺得又重新學習到了另一個層次的東西。
2008年9月14日 星期日
SOP for Re-creating Debian binary packages with dpkg-repack
# SOP for Re-creating Debian binary packages with dpkg-repack
#
# Description:
# If you've installed a Debian package upon a machine, but lost the binary archive,
# then it is difficult to copy that package to another machine.
# Thankfully is a simple solution for recreating a Debian package from an installed system.
# dpkg-repack allows you to turn a package which you've installed back into a binary .deb file.
#
# Reference: http://www.debian-administration.org/articles/499
# Date: 2008/09/04
# Author: Payton Chou
# step 1: Download
Download dpkg-repack from here
http://packages.debian.org/etch/all/dpkg-repack/download
# step 2: Install dpkg-repack
> dpkg -i dpkg-repack_1.25_all.deb
# step 3: Search which packages need to make binary debian packages, ex. ncs
> dpkg -l | grep ncs
601:ii libvncserver0 0.9.3.dfsg.1-2asus2 API to write one's own vnc server
619:ii libxandrosncs1 0.209-2 Xandros Network Connection System library
927:ii xandros-libxandrosncsui 4.0.511-2 Xandros Network Connection System UI Library
955:ii xandros-xncsapplet 4.0.511-2 Xandros Network Connection System Applet
956:ii xandros-xncsconfig 4.0.511-2 Xandros Network Configuration Panel
957:ii xandros-xncswizard 4.0.511-2 Xandros Internet Connection Wizard
959:ii xandrosncstools 0.51-11 Xandros Network Connection System - Command
# step 4: Make binary Debian packages
> dpkg-repack xandros-libxandrosncsui
dpkg-deb: building package `xandros-libxandrosncsui' in `./xandros-libxandrosncsui_4.0.511-2_i386.deb'.
> dpkg-repack xandros-xncsapplet
dpkg-deb: building package `xandros-xncsapplet' in `./xandros-xncsapplet_4.0.511-2_i386.deb'.
> dpkg-repack xandros-xncsconfig
dpkg-deb: building package `xandros-xncsconfig' in `./xandros-xncsconfig_4.0.511-2_i386.deb'.
> dpkg-repack xandros-xncswizard
dpkg-deb: building package `xandros-xncswizard' in `./xandros-xncswizard_4.0.511-2_i386.deb'.
> ls -alh xandros*
-rw-r--r-- 1 root root 264K 2008-09-04 17:29 xandros-libxandrosncsui_4.0.511-2_i386.deb
-rw-r--r-- 1 root root 430K 2008-09-04 17:30 xandros-xncsapplet_4.0.511-2_i386.deb
-rw-r--r-- 1 root root 207K 2008-09-04 17:31 xandros-xncsconfig_4.0.511-2_i386.deb
-rw-r--r-- 1 root root 497K 2008-09-04 17:31 xandros-xncswizard_4.0.511-2_i386.deb
# step 5: Copy your debian packages to another EPC
skip
# Final step: In another EPC, and your binary Debian packages are located in /mnt/ncs
> dpkg -Ri /mnt/ncs
Reference: http://down.gogobox.com.tw/payton345/fdhy2
#
# Description:
# If you've installed a Debian package upon a machine, but lost the binary archive,
# then it is difficult to copy that package to another machine.
# Thankfully is a simple solution for recreating a Debian package from an installed system.
# dpkg-repack allows you to turn a package which you've installed back into a binary .deb file.
#
# Reference: http://www.debian-administration.org/articles/499
# Date: 2008/09/04
# Author: Payton Chou
# step 1: Download
Download dpkg-repack from here
http://packages.debian.org/etch/all/dpkg-repack/download
# step 2: Install dpkg-repack
> dpkg -i dpkg-repack_1.25_all.deb
# step 3: Search which packages need to make binary debian packages, ex. ncs
> dpkg -l | grep ncs
601:ii libvncserver0 0.9.3.dfsg.1-2asus2 API to write one's own vnc server
619:ii libxandrosncs1 0.209-2 Xandros Network Connection System library
927:ii xandros-libxandrosncsui 4.0.511-2 Xandros Network Connection System UI Library
955:ii xandros-xncsapplet 4.0.511-2 Xandros Network Connection System Applet
956:ii xandros-xncsconfig 4.0.511-2 Xandros Network Configuration Panel
957:ii xandros-xncswizard 4.0.511-2 Xandros Internet Connection Wizard
959:ii xandrosncstools 0.51-11 Xandros Network Connection System - Command
# step 4: Make binary Debian packages
> dpkg-repack xandros-libxandrosncsui
dpkg-deb: building package `xandros-libxandrosncsui' in `./xandros-libxandrosncsui_4.0.511-2_i386.deb'.
> dpkg-repack xandros-xncsapplet
dpkg-deb: building package `xandros-xncsapplet' in `./xandros-xncsapplet_4.0.511-2_i386.deb'.
> dpkg-repack xandros-xncsconfig
dpkg-deb: building package `xandros-xncsconfig' in `./xandros-xncsconfig_4.0.511-2_i386.deb'.
> dpkg-repack xandros-xncswizard
dpkg-deb: building package `xandros-xncswizard' in `./xandros-xncswizard_4.0.511-2_i386.deb'.
> ls -alh xandros*
-rw-r--r-- 1 root root 264K 2008-09-04 17:29 xandros-libxandrosncsui_4.0.511-2_i386.deb
-rw-r--r-- 1 root root 430K 2008-09-04 17:30 xandros-xncsapplet_4.0.511-2_i386.deb
-rw-r--r-- 1 root root 207K 2008-09-04 17:31 xandros-xncsconfig_4.0.511-2_i386.deb
-rw-r--r-- 1 root root 497K 2008-09-04 17:31 xandros-xncswizard_4.0.511-2_i386.deb
# step 5: Copy your debian packages to another EPC
skip
# Final step: In another EPC, and your binary Debian packages are located in /mnt/ncs
> dpkg -Ri /mnt/ncs
Reference: http://down.gogobox.com.tw/payton345/fdhy2
我的簡歷
Information
Email: payton.chou@gmail.com
Phone: +886-3-5712121-56667-14
學經歷
1986-1992台北市立石牌國民小學
1992-1995台北市立石牌國民中學
1995-1998台北市立明倫高級中學
1998-2002私立義守大學資訊工程學系
2002-2004海軍陸戰隊陸戰隊學校服役
2004-2005拓碼科技軟體工程師
2006-2008國立交通大學資訊工程與科學研究所 指導教授 林盈達
興趣
爬山,溯溪,攀岩,唱歌,彈吉他,打羽球,打籃球,打電動,看書
學校重要經歷
1993-1994模範生(國二)
1998群育獎(高三畢業)
1998德育獎(高三畢業)
1995-1997模範生(高一與高二)
2002 義守大學資工系畢業生感言代表
興趣經歷
1995-1998明倫高中桌球校隊(高一至高三)
1995-1996明倫高中桌球個人賽男雙第一名(高一)
1995-1996明倫高中桌球個人賽男單第二名(高一)
1996-1997明倫高中桌球社公關組組長(高二)
1997第三屆慶安盃桌球錦標賽男雙亞軍 (高二)
1997-1998 明倫高中社長盃男單冠軍 (高二)
1997-1998明倫高中桌球社社長(高三)
1996-1997明倫高中班際排球賽第三名(高二)
1999-2000義守大學資工系送舊茶會-主持人(大二)
1999-2000義守大學藍天社-公關組組長(大二)
1999-2000義守大學藍天社暑期三民鄉原住民輔導營隊-教學組長(大二)
1999-2000義守大學藍天社迎新-器材組組長(大二)
2000-2001義守大學資工系-活動組組長(大三)
2000-2001義守大學資工系迎新露營-活動組長(大三)
2000-2001義守大學資工系迎新茶會-主持人(大三)
2000-2001義守大學資工系送舊茶會-總召(大三)
2000-2001義守大學藍天社暑期高雄寶來原住民輔導營隊-活動組長(大三)
2001-2002義守大學資工系暑期大社國中輔導營-值星官(大四)
2001-2002義守大學資工系送舊茶會-畢業生代表(大四)
2001-2002義守大學會計系迎新露營-活動組長(大四)
技能檢定
1999中華民國電腦教育發展協會視窗軟體檢定考試合格-word97,excel97
2000電腦軟體設計技術士技能檢定丙級
2000電腦硬體裝修技術士技能檢定丙級
營隊研習
1997交通大學資訊工程研習營結業
2000-2001 資策會Java程式設計養成班結業
1998 彩虹流行音樂營結業
2000 陽光大學活力康輔營結業
2006 NCTU-AXIS Summer English Language Program, AXIS EDUCATION AUSTRALIA
2007「專利制度及應用實務」訓練課程結業
專業經歷
1999-2000義守大學電算中心工讀生組長
2007 第三屆華陀盃 網路解疑大賽 冠軍
2007 High Speed Lab FTP server maintainer
On-going Projects
2007 Test Coverage Optimization Problems with Large Code Size (Sponsored by Cisco Systems, Inc, 2007~2008)
Past Projects
2005 Developing and maintaining the Switch Genius of Xtramus
2007 Interactive education flash web for Beginning Taiwanese
Journal Papers
1. Chi-Heng Chou, Tsung-Hsien Yang, Shih-Chiang Tsao, and Ying-Dar Lin, "Standard Operating Procedures for Embedded Linux Systems," Linux Journal, Issue 160, pp. 88-92, Aug 2007.
Book Chapters
1. Chi-Heng Chou,"Linux網路協定程式追蹤," in "計算機網路實驗," Ying-Dar Lin (editor), 國立交通大學出版社, pp. 35-52, 2007(ISBN 978 986 82997 3 3)
2. Chi-Heng Chou,"Linux子網域分割之設定與觀察," in "計算機網路實驗," Ying-Dar Lin (editor), 國立交通大學出版社, pp. 53-66, 2007(ISBN 978 986 82997 3 3)
Eee PC with touch screen and GPS inside
不久前,曾想想Eee PC如果有touch screen以及GPS inside的話,將可能會有哪些應用,以下是我的一些觀察。
Eee PC with touch screen and GPS inside
1.For GPS
a.Mobile GPS for everyone in city jungle (First one)
b.Stationary GPS for car ( ex. Mio, Garmin)
( 但是大小偏大,還有天線問題,不過可參考大尺寸汽車衛星導航商品 Mio C728 http://shopping.pchome.com.tw/?mod=item&func=exhibit&IT_NO=AEAC0P-A17909569&SR_NO=CGAD0G&ROWNO=5)
2.For Multimedia
a.Portable Digital TV ( ex. 飛來訊)
b.Media player ( ex. WorldRadio, iriver )
c.數位相框 ( ex. Viewsonic)
d.Portable DVD player ( ex. Sony, LG)
3.For Mobile NB
a.Skype everywhere ( First one)
b.Browse everywhere ( Better than HTC, iphone)
c.Remote control the E-family Eee Monitor (First one)
4.For Learn and Game
a.Interactive gamer ( ex. PSP, NDSL)
b.Portable library ( ex. 無敵CD, 哈電族 )
c.電子書閱覽器 ( ex. Amazon Kindle)
Conclusion:
Each application should have really easy BIG TOUCH BUTTON to replace keyboard.
( I'm really excited with 1.a. :) )
訂閱:
文章 (Atom)

